Showing posts with label Primary Schools. Show all posts

Saturday, 21 March 2026

Attenborough in space


Engaged, inquisitive, sharp-eyed and bright: ‘Attenborough Class’ at Langdon Primary School, about five km northeast of Dover, were a real joy to meet. Attenborough is a mixed Year 1 and 2 class, so the pupils are six/seven years old; this is definitely the youngest group of budding scientists I’ve had the pleasure of meeting. However, any nervousness on my part – and there was plenty! – was dispelled when the first group of pupils came out in the care of their teaching assistant, Clare. They were evidently keen to see something new, and having recently completed a space-themed study topic they also had a pretty good idea of what it was they’d be looking at.

What a delightful village primary school, with a mix of ‘traditional’ and modern buildings quietly set within grass and all-weather playing areas and with mature trees dotted around. My classroom for the morning was a patch of lawn in front of the Headteacher’s office window – the green arrow will point it out for you. (The headteacher, by the way, is my totally wonderful son, Andrew.) The view south from there was over the fence and across the small staff car park. Fortuitously, a large branch had recently been removed from the over-hanging tree so that we had a good view of the Sun’s path – and of the Sun itself as the clouds kindly thinned and cleared.

My first task with each small group was of course to make sure they knew never to look at the Sun without the sort of special equipment I was using. After that I introduced them to my pet robot and its view of the Sun … I had set up a Dwarf3 smart telescope to track the Sun so that I could show them an image on my ’phone. It was easy to point out from the image the string of three significant sunspots visible that day and to talk about what sunspots were. Having laid the foundations, each of them got the opportunity to view the Sun in more detail through the eyepiece of a telescope fitted with an appropriate solar filter. As is the case for first-time observers of all ages, it can be tricky for some to position their eye at the ‘sweet-spot’ near the eyepiece, but with a little coaching from Clare or from me everyone got to see the Sun as they’d not seen it before. Clare, and then class teacher Emma and other staff members also had a look; naturally, who wouldn’t want to have a go.
 
(Images supplied by the school in accordance with their rules on privacy and parental consent. The bald head is my responsibility.)  There’s nothing quite like having the privilege and the pleasure of watching someone see something qualitatively new to their experience, and to know that a seed of curiosity will have lodged in their minds. Germination, growth and fruition will depend on so many things in their young lives, but maybe …

My initial question to whoever was first in each group was the same: what colour is the Sun? It came as a surprise to everyone that it wasn’t the yellow they all used in their artwork: “It’s white!” was invariably the answer I got. Once everyone in the group had seen it we were able to talk briefly about the Sun’s colour and texture; the shell of a chicken’s egg was our working analogy. (For more detail on the nuanced topic of the Sun’s colour please see my earlier post on the subject, here.) In addition, several of the more observant pupils challenged my contention that three sunspots were visible – that’s all we could see from the raw Dwarf’s image – and declared that there were four. Brilliant: objective observation and the courage to defend it. I truly hope they continue in that vein; it bodes well for the future.

This is the view through my Dwarf3, post-processed when I got home to remove the annoying colouration added by the Dwarf’s solar filter and so that I could identify and label the active regions. (I have been meaning to replace their stock filter with something neutral, akin to the filter I made for the other telescope used that morning: a Skywatcher 72ed refractor fitted with a Baader solar film filter – see my earlier post, here, for details.)

As a parting gift I gave each of them a pair of eclipse-viewing glasses and told them about the partial eclipse that will be visible over the UK in August, during their school summer holidays. In fact, there will be two in August 2026 (see here):
  • 2nd August; the partial eclipse will begin around 9am BST. It will reach maximum at 10am and end around 11am. At maximum roughly 45% of the Sun will be in shadow.
  • 12th August; this partial eclipse will almost be total, with around 90% of the Sun being obscured by the Moon at the maximum. It'll begin at 6.17pm BST, with maximum at 7.13pm.
The glasses came with repeated warnings about not looking directly at the Sun without proper safety equipment. (These were the solar viewing glasses I managed to get at Astrofest earlier in the year, which I wrote about here.) Furthermore, I made the point that if the glasses were damaged in any way they shouldn’t be used. At this point one young person declared that he’d therefore definitely not be showing them to his brother 😉.

I’d love to go back after dark someday and help run – with friends from my local astronomy society – a stargazing evening; maybe next Winter when it gets dark early and there’s a clear sky, so that the pupils can bring their parents/carers with them. However, that’s in the hands of the school. In the meantime, of one thing I am certain: Sir David Attenborough would be proud of them.


Postscript:
A while after posting this I got a lovely thankyou card:


Wednesday, 11 January 2023

It’s got holes in it!


What do you see when you look at the Moon?

If you live with high levels of light pollution from streetlamps or commercial buildings or an annoying floodlight on a neighbour’s house – all of which are significant problems – then the Moon may be one of the few celestial object you can bank on seeing in the night sky. It’s a reliable presence whether we’re in the middle of town or the depths of the countryside. So, what do you see? A bright disk/crescent with some darker patches; perhaps you also notice a few curved lines?

A couple of weeks before Christmas I had the opportunity of showing more than fifty 9-10 year-olds* and their teachers what the (daytime) Moon looks like through a telescope. A handful told me that they had an older sibling or a parent with a telescope, but for most this was evidently a wholly new experience. In a brief introduction inside their warm school building – it was -2ºC outside – I’d suggested two or three things they might look out for: the lava fields/‘seas’ for sure, but also the distinct curve of the lunar Alps and the nearby crater named after Archimedes. For the majority, the first-timers, they all – and I do mean ALL – seemed to find the experience quite special, almost magical in some cases. Some of their reactions were priceless; three or four of them looked, looked again and then told me that the Moon had holes in it, which was a novel way to describe lava seas and deep craters. One or two uttered something I pretended not to hear, but which made me chuckle inside nevertheless.
Although not taken on the day, or even through the same telescope, this is similar to the view everyone would have had of the Moon during our morning session. I’ve added a few labels, including the Apollo 11 landing site, to make it easier to orient ourselves. For a good quality lunar map I have installed ‘LunarMapHD’ on my phone.

In order to avoid having anyone get too cold – anyone other than me and the member of staff with me that is – there were only eight pupils out there at any one time and they were all wrapped up against the chill. Finally, the staff members also had a chance to take a peek before we bundled back inside for an extended and wonderfully lively Q&A session. As with my visit to the school towards the end of the last academic year, when the previous Year 5 classes had the chance safely to observe sunspots (see here), the questions posed were far-ranging and challenging. More than once I had to say that I didn’t have an answer, but on the whole we were able to cover a lot of ground to everyone’s satisfaction. Some of the questions opened up important generic topics like the nature of science and the need to make decisions based on the best available evidence, whereas others were a lot more specific. In that latter camp there were many which arose from what they’d observed: what are the darker areas and why are there fewer craters within them; why are there some areas that seem particularly bright; how did the Moon form …? (Answers below.) We also explored the lifetime of stars, exoplanets and a question that arose at least three times in one guise or another: why are the planets different colours?
This is a composite image of a few of the morning's lunar observers; such a great bunch. (The images are included with appropriate consent and permissions having been obtained.)

All-in-all I was deeply impressed by the degree of their engagement and by their perceptive and well-phrased questions. I suspect that there are several budding scientists in their number, and I wish them well.
Happy lunar observing everyone 😀.

____________________________________

* I absolutely must mention the warm and enthusiastic welcome I got at The Churchill School which included the help of two class members, Teddy-Rose and Lewis (see image below, reproduced with appropriate permissions): with great care they helped me to ferry my equipment from the car to the playground we’d be using. The staff were amazing, and filled me with confidence that these children were in the best of hands: thank you for the invitation Mrs. Newport (yes, well spotted: the best of daughters-in-law) and thank you to your colleagues: Mr. Moore, who braved the cold with me in order to take photographs, Mrs. Lejeune and Mrs. Coleman. Also, many thanks to the school’s Deputy Head, Andrew, who made me a mug of tea 😊.


A few brief illustrated responses to the questions posed above:
The darker areas are solidified lava flows following a past impact. If something large enough collided with the Moon there’d be sufficient energy released to melt some of the lunar surface – to turn it into lava – which then cools and solidifies to leave a smooth patch. This violent process will of course obliterate all traces of former craters caused by smaller impact events, which is why there are fewer craters to be seen. It also means that any craters that do sit within a lava sea were caused relatively recently in geological terms.

The Moon formed from the debris of a gigantic collision between an original Earth and another body about the size of present-day Mars which took place in the early stages of the solar system. This is almost certainly easier to comprehend in pictures than through words alone, so take a look at one or both of these video clips: BBCNASA.

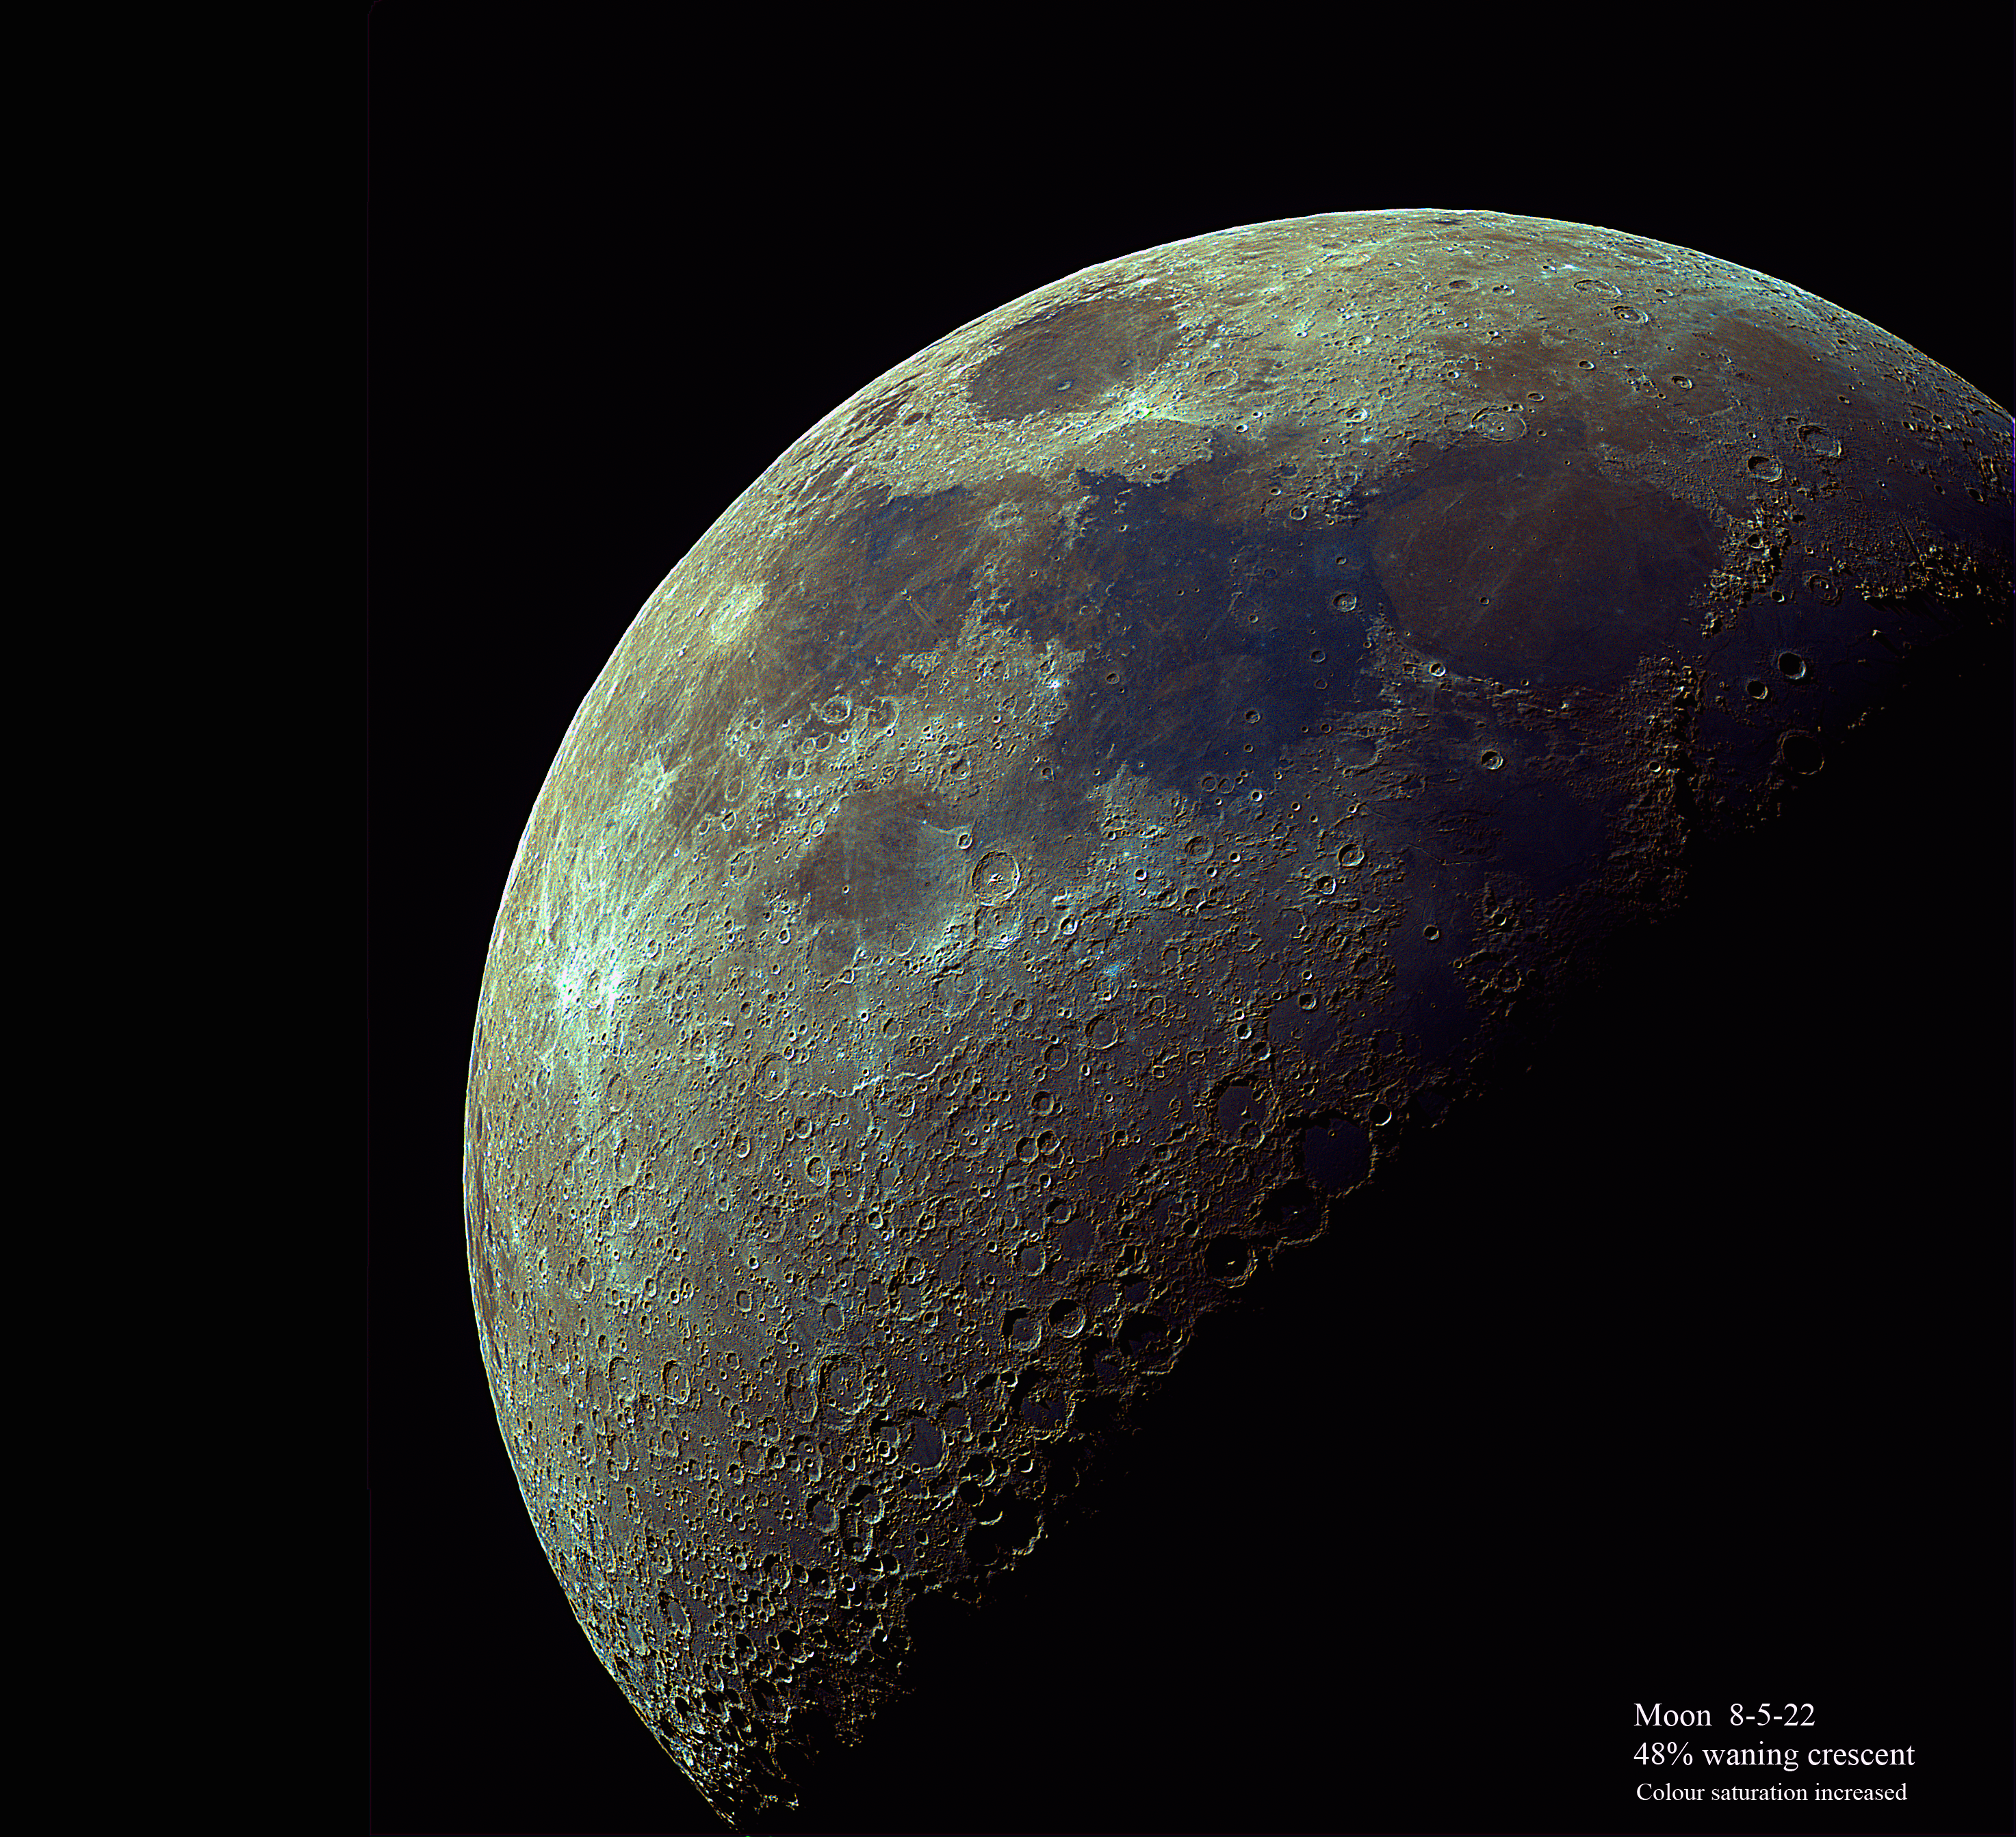
There’s no left or right, up or down in space so I’ll not apologise for the fact that this image of mine is flipped horizontally compared to the earlier one. The point of including it is to show that even the Moon has colour. We don’t see it because it’s muted and because it’s so bright overall that the colours are washed out – technically, it has a high albedo which simply means that it reflects a high percentage of the sunlight falling on it. However, in a digital image it’s possible to increase the colour saturation whilst holding back the brightness to show that the Moon’s surface geology does indeed imbue colour. As with all the planets, they appear as one colour or another by virtue of what’s on the outer surface. Thus Venus appears white because it’s totally covered with reflective clouds, whereas Mars has a reddish hue because there’s a lot of rust (oxidised iron compounds) on its surface; Uranus and Neptune appear blue-green and blue because of the hydrocarbon gasses which make up their respective atmospheres. (The Sun and other stars are different simply because they generate their own light; their varying colours from red to blue arise from their surface temperatures.)

There are several particularly bright areas which, if one looks closely, often seem to be associated with bright ‘rays’ extending from a crater or cluster of craters. It turns out that there is quite a lot of glass on the Moon’s surface – made when material was melted in a collision with, perhaps, a small asteroid – and it’s this material that reflects so much sunlight. Most domestic glass on Earth, like window glass for example, is made from a mixture of various chemicals with silica (sand!) but we can make a glassy material from all sorts of source materials if the heating and cooling rates are right. There are some terrestrial examples of this shown in the image above. The material shown on the left is a naturally-occurring glass called tektite and the yellowy material next to it is often referred to as ‘desert glass’; both are relatively pure samples of silica glass made when a meteorite plummeted into desert sand. The central image is of obsidian glass, which is formed in a volcano. The sample on the right is a glassy material which formed as a waste product in a commercial furnace dating to the Middle Ages.

We all know that shadows are longer when the Sun is low in the sky; the same holds true on the Moon, so the further away we are from a full Moon – when the Moon is face-on to the Sun – the easier it will be to pick out mountain ranges, valleys and craters. Speaking of mountains, this image of the Sun, taken alongside one of my grandsons during the partial solar eclipse which occurred on October 25th 2022, shows that the Moon has a slightly ‘crinkly’ edge because of its many mountains. (You’ll also be able to spot the sunspot clusters that were visible at the time.) I hope it goes without saying that these images are not to scale.


Wednesday, 20 July 2022

♪ The Sun has got its spots on … ♫


It has been a whole year since I last posted. I’m sure that this is in part one of many diverse legacies of SARS-COV2, but it’s also related to the fact that my primary focus for the blog was always to reflect on living life as a scientist.* I have in the meantime continued to write about topics in science elsewhere: using my u3a local branch’s social media group example. However, the point is that I intended only to write on this blog as and when my week involved me in rolling up my metaphorical scientists’ sleeves and getting directly involved. You can perhaps see where this is headed …

Last week I visited Year 5 of The Churchill School; one of the two classes is taught by my talented daughter-in-law, and it was she who invited me. I’ve been to the school many times before, but less often as a visiting scientist (e.g. here). I freely confess that school classrooms unnerve me. I (mostly) loved school when I was part of the whole thing as a child and I have the deepest of respect for excellent teachers like my daughter-in-law. However, nowadays, the thought of standing in front of a class of children – let alone two 30+ classes combined – with the aim of leading them into some new knowledge and understanding renders me a little weak at the knees. It was truly lovely, then, to get a warm welcome by the four staff members involved – but it was the eagerness of the 9/10 year-olds that completely blew me away.

I turned up while they were still in a school assembly so that I could get everything set up in peace. I had brought with me my newly acquired second-hand 72 mm refractor, the lightest of my two equatorial mounts and a tray of bits and pieces which included a homemade solar filter. The neutral filter material, which removes 99.999% of the incident light, is of the highest standard, but I can’t say the same thing about the cardboard and duct tape assembly that holds it in place in front of the telescope’s objective lens. In order for the equatorial mount’s tiny battery-driven motors to keep the telescope pointing towards the Sun over time, it has to be tilted to the correct latitude, levelled and compass-aligned. The telescope itself also needs to be balanced (both front to back and side to side). Once the Sun had been located and its image focused I have to say that I was more than relieved to see several sunspot clusters clearly visible; passing clouds were, as ever, less predictable. (By the way, the images taken at the school were carefully checked by them before they were released for my use; faces have been covered/blurred as necessary.)
I was given a generous introduction inside the school before we all trooped out to the school’s expansive playing field and the children sat in a semi-circle on the summer-dry grass. I kept my own introduction to the telescope very simple; no-one needed to know about focal lengths and lenses in order to observe the Sun. What did need to be shared at the outset though was the standard but ever-vital warning not to look directly at the Sun for fear of damaging the eyes. In this instance it was important to go much further, making the point that looking at the Sun through binoculars or a telescope is likely to cause blindness without the appropriate safety measures in place. You also have now been warned 😉
I had given them a rough idea where the sunspot clusters were by describing the Sun’s disk as a clock face: two and eight o’clock got them to the most obvious, although it was a busy day on the Sun and there was a lot to choose from. This is an image captured by a talented amateur astronomer, Roger Hyman ( find him here or here) on that same day; the image is used with his permission. The orientation isn’t exactly as we saw it – the angle of the camera he was using and other factors will affect that, but it’s close enough. All clusters of sunspots are given a unique identifying number and on Friday 15th July 2022 they were, beginning at the 2:30 position and moving clockwise: 3057, 3056, 3055 and 3053 (see here).
In between the slowly drifting clouds, everyone got a chance to look through the telescope – even the adults. All but a handful said they’d seen the sunspots: some after a bit of coaching in terms of how to use an eyepiece. It took a while, and given the need for a lot of patience they did astonishingly well.

Every time a cloud came over we used it as an opportunity for questions, which came thick and fast. Indeed, the flow of questions continued when everyone had had the opportunity to take a peek and we had moved back inside the building. These were exceptionally wide-ranging, and varied from the scientifically and philosophically challenging to the more speculative ‘what if’ (the Sun disappeared, you went into a black hole, …) and ‘would you’ (like to go into space, live on Mars, …) type of question. All of them deserved to be taken seriously and given the best response I could muster. I can only say that I was genuinely impressed; it was uplifting to see so much evidence of the potential on display within that classroom. A few of them were obviously highly clued up, and several made a point of telling me that they wanted to be a scientist. Perhaps what I should have said in response, but for some reason didn’t, is that in a sense they already were – just as much as I was at their age.

I was at the school for almost 2½ hours in total, although it felt far briefer than that.

I promised this blog post in order to provide a reminder of what we did, and to offer a little information in a more coherent way than I fear I managed on the day. Perhaps one might start by saying that sunspots are associated with a localised increase in the Sun’s magnetic field. They appear darker than their surroundings simply because they are a little cooler, with their central region (the umbra) at about 3000-4000ºC compared to the average of 6000ºC. Their sizes vary a great deal, with the largest being several times the diameter of the Earth. (If you are able to see the above image of the Sun on a reasonably large screen then you might notice the small blue dot I inserted to the left hand side: that is approximately the size of the Earth on the same scale.) Sunspots can last for days, but eventually disappear. The number of sunspots visible at any one time varies over the eleven years of the solar activity cycle; we’ll be at the next maximum in this cycle in 2024. You can find lots more information here, here and here; a recent BBC ‘Sky at Night’ programme covered some of this ground also.

Perhaps a fitting way to close this post would be to offer a couple of suggestions for useful astronomy apps and to share a small number of my own images. The first app I downloaded when picking up after retiring the hobby of my youth (from Android Play Store) was ‘Sky Map’, which I still use as a simple interactive guide to the sky; for a little more sophistication one might go for ‘Stellarium’. The choice is yours. In addition, and especially if you want to pursue this further, I’d recommend joining your nearest amateur astronomy group. Unfortunately, the one I’m in – Ashford Amateur Astronomy Society – is an hour’s drive from my home; maybe there’s one closer to where you live.

The above were taken at different dates, through different telescopes and with different cameras. The result is that we have a fairly recent image of the whole disc of the Sun together with a more highly magnified image of one part of the solar disc, and a close-up of two particular sunspot clusters taken in 2021 which bring out a bit more detail in terms of their structure. You’ll notice that each sunspot comprises a dark central region (the umbra) and a somewhat bright outer region (the penumbra); as you might anticipate, the penumbra has a temperature which is intermediate between the umbra’s and the Sun’s average surface temperature.

Happy observing.


* I retired from my paid employment as an academic and multidisciplinary materials research team leader about seven years ago, but I’m still a scientist – just as I was as far back into childhood as I can remember; I’ve covered this ground in earlier posts (e.g. here).