Friday 26 March 2021

Mizar


My father was part-way through his apprenticeship as a bricklayer when the light escaped from its star and began its journey across space. He had left school in his early-teens, as was the norm for working class kids back then. War in Europe was brewing, and although he didn’t yet know it he’d soon be lying about his age so that he could sign up for the parachute regiment; his apprenticeship would be put on hold for the duration. Skip forward eighty three years to the present day; to be precise, to the tail-end of the day on which the Sun had set on 2020-21’s astronomical winter: the night before the Vernal/Spring Equinox. The sky was clear and there was only a slight breeze: almost perfect for a bit of star-gazing. Within the hour I could be found in my front garden looking back in time, in a manner of speaking, to those late 1930s. My target for the evening was Mizar in The Plough, a part of Ursa Major. Mizar is a binary star system which sits at about 83 light years (ly) from us – in other words, the light which fell into my telescope that evening left the stars’ surface 83 years ago. As it happens, the Mizar binary system is more intriguing than it appears at first sight: it has a few surprises up its metaphorical sleeve.

On the left is Ursa Major – the Great Bear. Technically, we ought to be calling it an asterism rather than a constellation since it has more to do with our innate human tendency to invent patterns where there are none than it does to an objectively fixed shape. Although some of the stars in Ursa Major are at roughly the same distance from us (in the region of 80-85 ly, light years – the distance light travels in eighty years) and have similar trajectories in space, others do not. Thus, in times past and in times yet to come what we might perceive as a bear would have appeared/will appear quite different. Mizar forms a particularly noticeable star within part of the large asterism of Ursa Major – it’s the kink in the prominent arm of what is commonly called The Plough (or Big Dipper, or Saucepan, or …). The images used above are taken from ‘Stellarium’, a free-to-download computer package allowing one to generate bespoke star maps.

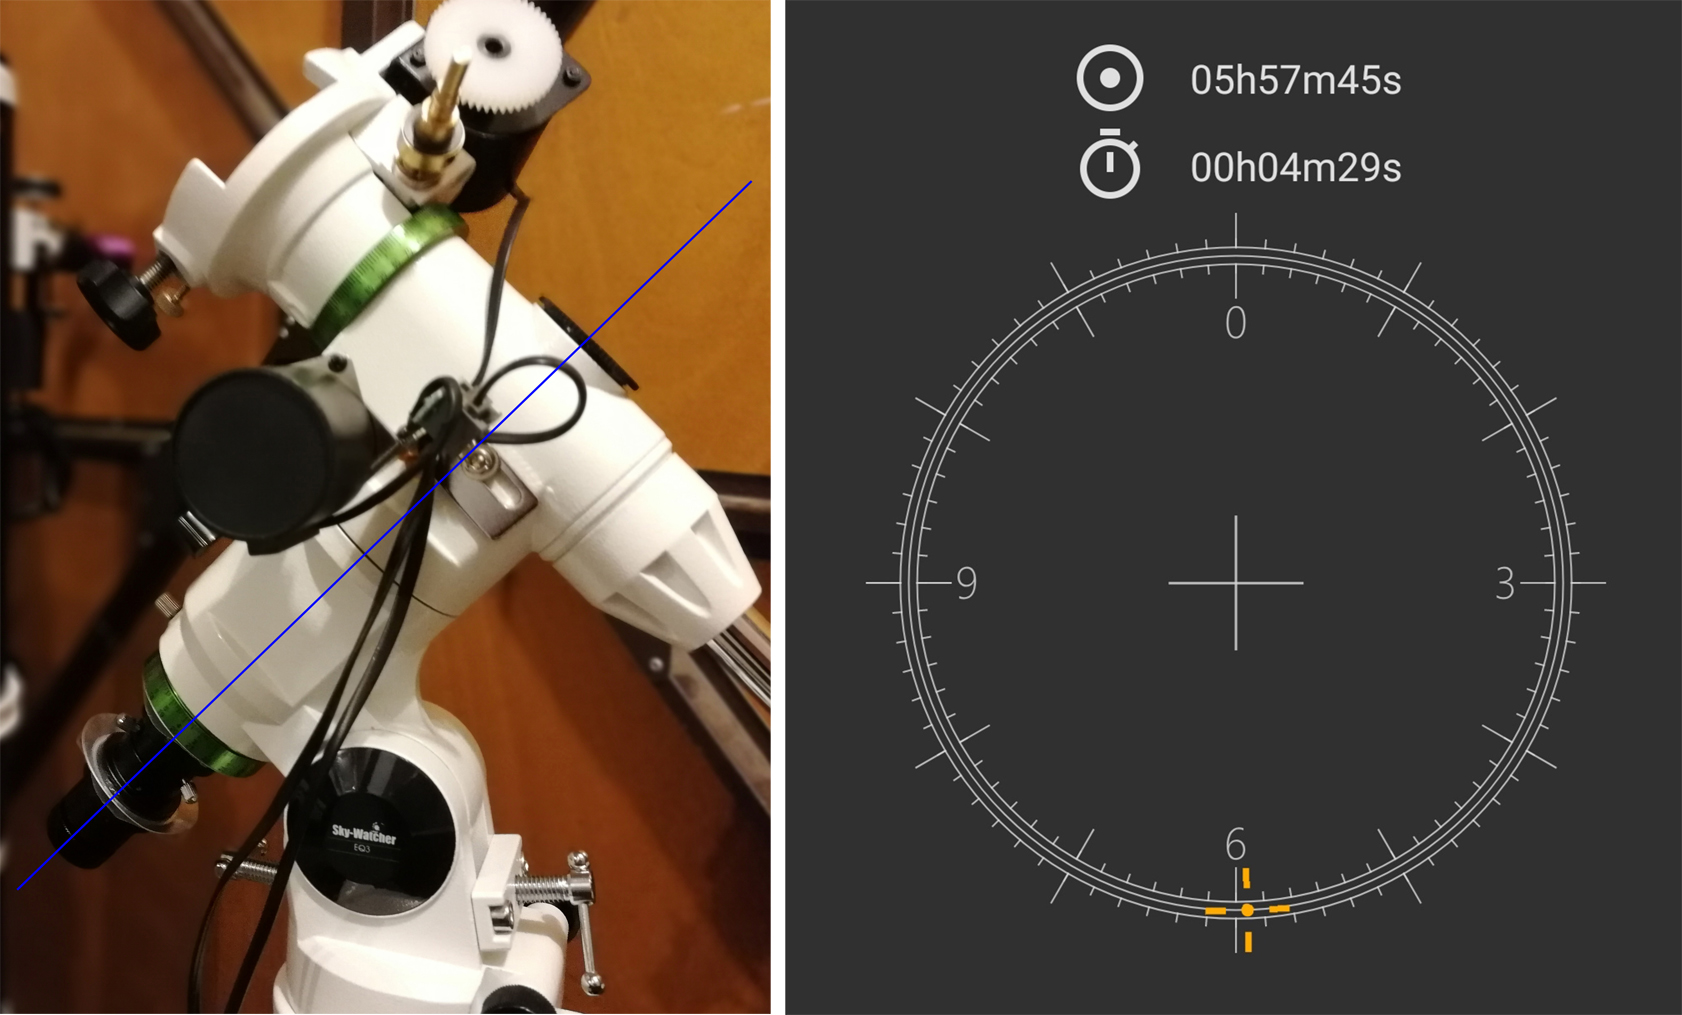
My primary goal since beginning to dabble in astrophotography after my retirement has been to gain reasonable images of each of the planets in our solar system; to this I might add a long list of lunar features and a sunspot or two. I’ve made a start (see former posts here and here) but there’s so much more I want to do. Moreover, along the way I’d also like to capture images of a few more distant objects: galaxies, star clusters, nebulae. All this requires that I gain an understanding of what my telescope + astro-camera can achieve and the ways in which I might realise that potential. For instance, the telescope’s focal length and magnification, and the size of the CCD chip in the camera together limit the effective field of view (FoV) available to me and define the resolution achievable. Again, in the post immediately previous to this one I mentioned the need to align the telescope’s mount correctly using the Pole Star (Polaris) so that an object might be accurately tracked across the sky as the Earth rotates beneath. This is a task rendered difficult and uncomfortable, even painful, when one tries to manage it with creaking knees and an inflexible spine – finding a way to mitigate this remains on my ‘to do’ list. (I'm tempted to remark that the designers of the polarscopes on the market have really missed a trick here: building in a mirror or prism to allow the eyepiece to face outward or upward would solve this problem at a stroke.) I also expressed the hope that I could, with my smartphone attached to the telescope, use one of the many sky chart apps as a way of navigating to particular target objects. Thus it was on this particular evening that I decided to do some experiments in order to explore the issues. Given the aim, what follows almost necessary contains a technical element to it; hopefully not too much.

Although I currently see no way around the physical discomfort of the polar alignment process, I did at least achieve some success this time around – and the data to verify that statement. The results weren’t perfect, but I think I understand why. Objects initially centre-screen were therefore still drifting slowly off. Next time. However, by focusing on a star and generating images as a function of the exposure time, one can see when the image ceases to be circular and develops an elongation due to the inaccurate tracking. That is to say, we can ask how long an exposure is possible before there is blurring due to the star’s apparent motion across my laptop screen. Now, for all astrophotography it is necessary to collect a number of individual sub-exposures and then stack the best of them to generate a final image since this allows one to reduce the issues of atmospheric turbulence. For the purposes of this exercise I collected 500-1000 ‘subs’ and typically used the best 30% of them. The results are shown below.

These images show Mizar A and B (see below) with sub-exposures set to 51, 67, 130, 300 and 500 ms (milli-seconds) respectively left to right. The three shortest exposure times generated final images too faint to show up clearly in a blog post and I have therefore artificially altered the brightness. Only at 500 ms (i.e. ½ s) do we see evidence of distortion in both stars. Improved polar alignment will hopefully allow the extended exposure times of a few seconds required for more faint objects. However, even the results shown here are sufficient for the solar system targets I have in mind, and a great deal more besides. (I ought to note that the camera focus, a critical preliminary stage in the overall experiment, was achieved using a Bahtinov mask as discussed in earlier ‘stargazing’ posts.)

The images shown above give us a first insight into the complexity of the Mizar binary system. Now, the binary star that one is supposed to be able to see with the naked eye, but which in practice requires good eyesight and the absence of light polluted skies – or the use of a pair of binoculars – comprises Mizar and the fainter star Alcor. They are at a distance of approximately one lightyear (1 ly) from each other and are therefore only weakly bound together gravitationally; they therefore take several hundred thousand years to orbit each other. It turns out that Mizar and Alcor are themselves both binary stars, and whilst the dwarf star associated with Alcor is too small/dim to be seen directly, the Mizar binary – Mizar A and Mizar B – can be resolved even with my amateur setup. These two stars, one much brighter that the other, orbit each other every 5000 years or so at a very close distance – only about ten times the distance from the Sun to Pluto. It takes about 5½ hours for the Sun’s light to reach Pluto, meaning that the Mizar A⸱⸱⸱B distance is only about 55 lh (light hours; the Earth orbits the Sun at a distance of approximately 8½ light minutes). The stars are all relatively young at about 370 million years; by comparison, the Sun is approximately twelve times as old at 4½ billion years.

The above is an inverted image of the view I captured. (I inverted it simply because it’s easier to see ‘black’ stars against a pale background; the superimposed circles should also help.) Mizar A and B are on the right and Alcor – the principal component to the binary system visible with binoculars – is on the left. The figures shown below will hopefully be easier to follow as I’ve added labels. The image is the result of stacking the best 40% of 1000 individual 75 ms frames, so 30 s in total. I probably ought to have collected more data, but the evening’s experiment was about testing my stargazing equipment rather than achieving polished pictures.

We’re not finished with the complexity of this system yet: both Mizar A and Mizar B have been discovered to be binary stars in their own right (Aa and Ab, Ba and Bb should you have a desire to label them). These pairs have orbital periods as short as three weeks or so. As with Alcor’s partner star, they are not visible using anything other than the most sophisticated equipment. However, it’s still an interesting star system to have examined: not a simple binary pair at all but rather a multi-star system – a sextuplet if you will. I was delighted to have seen three stars within the system although being able to add something of their ‘backstory’ enhances the fun. There are several good descriptions of the system available online, e.g. here, here and here .

We need to cover a few preliminaries before I can tell you what the results reveal. Specifically, we need to understand the measurement scale used to describe the apparent separation of two objects in the sky. From one horizon across the arc of the sky to the opposite horizon is 180º (i.e. half a circle), but a degree is too large a unit for many purposes, so we may divide it into sixty arc minutes (arcmin, sometimes simply ′). The Moon and the Sun both appear to be about 30 arcmin across for example, ½º. Even an arcmin is too large on occasion so we may divide that again into sixty arc seconds (arcsec or ′′). Having got that under our belt, the diagram below shows the results obtained.
The Mizar⸱⸱⸱Alcor separation as seen from the Earth is about 11.8 arcmin. This separation gives me the chance to measure experimentally my telescope+camera’s field-of-view. On this basis I estimate my equipment’s field-of-view – the amount of the sky displayed on my laptop screen – to be 16 x 9 arcmin. This is small; it’s no wonder I have to make mosaics in order to create an image of the Moon. The Mizar A and B pair offered one more useful measurement. When viewed from the Earth they appear separated by 14.4 arcsec; this suggests that I can hope to resolve objects separated by only 4-5 arcsec. I’m quite happy with that.

Dad would have enjoyed reading this post, not because he was into astronomy as such, but nevertheless ...  Only later in my life, when I had watched my children begin to shape their lives, did I more fully realise how important his support had been as I moved inexorably towards a life so different to his own. This included helping me to buy my very first telescope, which I still have. It therefore seems entirely natural to think of him as I reflect on my evening with Mizar.


Saturday 6 March 2021

More pictures of a stargazer


Back in August 2020, whilst those in the UK who were not designated ‘clinically extremely vulnerable’ were enjoying a transitory relaxation of covid-19 lockdown rules, I posted a synopsis of my early attempts at astrophotography (here). This was my celebration of a return in retirement to the hobbies of childhood and teenage: astronomy and the geeky side of photography. I remain moderately pleased with the images I shared then and offer now, even though they bear no comparison to those readily available online from professionals and experienced amateurs alike; the essential point is that they are my images. The targets were tracked down by me (without the benefit of an automated navigation system, often referred to as a ‘GoTo’ system) using a telescope I had set up; the images were captured to my laptop’s hard-drive and the data processed using the desktop in my study. It’s personal. Having said that, most of the targets were fairly easy to find and I used only the necessary basic levels of data processing software. This seems like an opportune moment to record and reflect upon my progress … such as it is, given the dearth of suitable conditions for observing during this past year. The fact of the matter is that I not only need a clear sky but also the near-absence of wind in order to get anywhere at all. Even when both criteria are ostensibly satisfied there may be too much turbulence in the upper atmosphere to achieve anything much. Nevertheless, fun has been had and I continue to take baby steps forwards.

New images.
Top row left to right: Tycho, an impact crater near the Moon’s South pole; Mare Nectaris, the Sea of Nectar lava plain; Clavius, an impact crater (note the bright ‘rays’ coming from it: these contain reflective glassy materials).
Middle row: the Mizar A-B binary star system in The Plough; Uranus (image expanded).
Bottom row: M42, the star-forming nebula in Orion (my second attempt, the first being in my previous post); Betelgeuse, a red giant star in the same constellation (image expanded). The green glow in M42 comes from the oxygen atoms in the cloud glowing as they are bombarded by light from those four bright central stars – it’s the same physical process that gives us the aurora on Earth.

The topmost video is of a single star imaged onto my laptop screen; the evening had been perfectly still when I was setting up then a breeze started: only 7 mph, but with modest gusts - the results are self-evident. Even on a still night, upper-atmosphere turbulence can distort the image in the way shown in the lower image of the Moon.

One of the purchases I made has eased the fraught but absolutely essential process of achieving a precise telescope focus. As purchased, my telescope had a manual rack-and-pinion focusing wheel; classic. I described the frustrations of its use in my earlier post. Thus, when I saw in a sale a motorized drive I could retrofit to the focus mechanism I snapped it up. Now I can alter the focus without setting up vibrations in the telescope and needing to wait for everything to settle down between each adjustment as I hone in on the perfect setting. Moreover, this also made it practicable to use a software tool in conjunction with my Bahtinov mask – also mentioned in the previous post – which provides a real-time quantitative estimate of focus quality.
A frightening level of force was required in order to twist off the original wheel (identical to the remaining wheel at the top of the image; it was glued onto the threaded shaft).

A key weakness intrinsic to my setup has been the alignment of the telescope’s equitorial mount: get it right and the target object stays centre-screen as the mount’s motors compensate for the rotation of the Earth; get it even slightly wrong and the target’s image will drift slowly away. The addition of a polarscope – a Christmas present – ought to have solved the problem. In essence this is a small telescope which fits directly to the mount and is designed to allow the system to be aligned using Polaris, the Pole Star. If the mount is set up correctly, then one can attach the telescope in the confident knowledge that a target object, once located, will be perfectly tracked thereafter. That’s the theory. In practice I had a false start because the polarscope wasn’t perfectly aligned with the axis of rotation of the mount: if the polarscope itself is misaligned then all the other steps in the process topple over. Using a point on a distant neighbour’s TV aerial as a daylight target I have overcome this particular stumbling block, I think. However, there next arises the need to position Polaris correctly in the polarscope’s field of view – it’s not at a point in the centre because Polaris is not precisely at 90º (i.e. above the Earth’s axis of rotation) but on one of a set of concentric circles at a position that varies with the time of day. I got this slightly wrong on the first outing so, although tracking was improved, I still couldn’t risk the longer exposure times necessary for fainter objects. I found an app for my ’phone which takes the work out of calculating Polaris’ position on the target circles so I am hopeful of being able to take another step forward next time the conditions are right.
The polarscope is shown above, fitted to be on the axis of rotation of my equitorial mount. (I've added a blue line to the image in order to highlight this.) Light from Polaris passes through a graticule within the small telescope and the mount’s alignment is fine-tuned to place Polaris on target – the appropriate position having been calculated by an app on my ’phone (see the screenshot on the right). Note that the angle of the polarscope/mount is 51.3º, this being my latitude. On an age-related note, I must add that the contortions I need to force upon my body in order to site Polaris through an eyepiece only 1-1.5 m above the ground and inclined at 51º are entirely non-trivial.

Locating objects remains a challenge unless they are bright or easily spotted in relation to readily identifiable stars/constellations nearby. There are two methods I hope to try in order to ease this problem. One is to place a known star in the centre of my field of view and then set the telescope mount’s celestial coordinates scales (its Right Ascension, RA, and declination, dec – akin to longitude and latitude respectively) to that star’s documented position. Thereafter, I ought to be able reliably to move the telescope to any given new object’s coordinates once I’ve looked them up. The second method I’m keen to try involves attaching my smartphone to the telescope using a suitable holder and undertaking an analogous process using one of the myriad of astronomy apps available. Thus, by sighting a known target in the telescope and then tweaking the alignment of my ’phone so that the corresponding object is displayed centre-screen, I ought then to be able to navigate to any other object using the app. Hopefully, this will take me to some of the fainter objects I might like to see such as a selection of nebulae and galaxies. This is all a work in progress, so we shall see.


_______________________________________

Extras, for those readers who just don’t know when to stop 😉

Useful Apps
I mentioned the image capture and processing software I use in my previous post and won’t cover them again here. What might be useful is a list of the apps I use; these are all for the Android operating system, but I’m sure there’ll be identical or similar apps available also for Apple/Windows ’phones:
  • For general navigation around the night sky and to find the location of particular objects I mostly use Sky Map as I appreciate its simplicity of use; I also have SkySafari and SkEye installed and I use them also.
  • The tool I have discovered as an aid to polar alignment is Polar Clock; PolarAligner can also be useful and I have it installed.
  • By far the best tool I have found for identifying features on the Moon is LunarMap HD.
  • Reliable forecasts for cloud cover are a real boon and I am grateful to my ex-colleague Dirk Froebrich, a professional astronomer, for pointing me towards Weather&Radar. This not only shows meteorological radar images in real time but also has the facility to run the clock forward: using the previous 90 minutes of radar data it displays the likely position of any clouds in user’s vicinity for the following 90 minutes. It’s not perfect but, in my experience, it’s pretty good.
Pixel counting
Large objects appear smaller if they are further away. This is as true in astronomy as it is in everyday life. Out of curiosity, I’ve taken a look back at the images I have managed to capture since beginning to try my hand at astrophotography and attempted to gauge their apparent size by counting the number of pixels from one side to the other. I say ‘attempted’ simply because there is a little uncertainty introduced by the optics: a point source of light is likely to show up in more than one of the camera detector’s pixels. At to that the effects of imperfect focusing, especially earlier on in my observations, and the ‘spread’ will become a more significant issue. This is a pretty universal issue, but it does mean that I need to make a ‘best guess’ estimate at the true extent of the object; the smaller the object appears, the larger the effect of any uncertainties.

Both the Sun and the Moon are huge in this respect: I cannot fit more than a fraction of their visible surface in my telescope/camera’s field of view. I do of course have the potential to image in relatively fine detail smaller areas on the surface – like individual lunar craters (down to about 15-20 km across) or the convection cell boundaries on the Sun – and this is a continuing source of delight.

In the same camp come many of the more easily located deep space objects, such as M42 (the star-forming nebula in Orion), M31 (Andromeda) or M45 (the Pleiades); each of them has an apparent size that exceeds by far the effective field of view of my telescope-camera setup. Perhaps counter-intuitively, magnification is not always the most valuable thing associated with a telescope – these deep space objects are a case in point. The key benefit of a telescope for objects such as these is its large aperture: it’s good at ‘gathering light’. Combine the large aperture with a long exposure time (more usually, a computer-managed stack of hundreds⸱⸱⸱thousands of individual exposures) and it becomes possible to reveal details and colours simply not visible otherwise. Whilst my setup is pretty good for viewing planets or individual stars it has too narrow a field of view for the more extensive objects. A larger chip than the 2 Mp one in my astro-camera would help, but I’d ideally also have a second, smaller telescope. It’s not going to happen; thankfully, I have a very long list of fascinating and beautiful objects still to capture for which my setup will do nicely.

Individual stars are at the other end of the scale. Mizar and Sirius both look to be in the region of two pixels in diameter, with Mizar probably appearing a shade smaller. Betelgeuse on the other hand, a red giant, steps this up to roughly three pixels across. (Creating purposefully unfocused images is actually a good way to reveal the differences in star colours.)

If now we turn to the planets in our Solar System the whole distance-apparent size phenomenon really begins to show up. For instance, when Mars was near its closest approach to the Earth during 2020 it appeared to be approximately 39 pixels across – meaning that some surface detail could be seen. This dropped to about half once the separation between us had increased again. Jupiter is almost three and a half times further away from the Sun as is Mars (779 M km and 228 M km respectively), but at about the same time as Mars appeared to have a diameter approaching 40 pixels Jupiter presented at a whopping 140 pixels across. Jupiter is really big. Even Saturn, further away still at 1,434 M km, appears as big as Mars: the planet itself measuring 37 pixels in diameter, with the rings taking this figure up to about 80 pixels. Similarly, Venus weighs in at 42 pixels across whereas the much larger but far, far more distant planet Uranus (2,871 M km from the Sun) shared its blue-green face across a circle of diameter 11 pixels only. If you would like a less casual approach to this question of apparent size I suggest the excellent article available here. Now, it is technically possible to increase the magnification of my telescope+camera from its current value of 48X by interposing a ‘Barlow lens’ between the telescope and the astro-camera. This is a diverging lens and it has the effect of increasing the effective focal length of the telescope, commonly by a factor of two. This would take my setup to 96X magnification. One day I shall try this – but it requires absolutely ideal observing conditions since that increased magnification will accentuate the effects of atmospheric turbulence and one might end up no better off overall. (The likelihood of such ideal conditions falling on a day when both the planet and I are available is not high in the UK.)