It’s a good job I write primarily for myself, for the sheer pleasure of playing with words as a way to uncover my thoughts. It’s a good job because it allows me cheerfully to draft this post even though I’m sure that, for some of its readers, there’ll be a sharp intake of breath as they discern my ignorance and naïvety. I’m going to share with you my reflections on the stumbling restart in retirement of two of my childhood hobbies: astronomy and photography. In truth, neither of those terms are being used properly. I’ve seen the work of amateurs who take amazing photographs and I don’t compare – I was always more interested in aspects of technique, and, back in the day this included processing of ‘black and white’ photographs in various borrowed darkrooms. Even now, you’ll see me playing with the options on my smartphone rather than worrying about composition. Likewise, I’ve worked alongside and been in awe of talented professional astronomers (see
here) and I marvel at the knowledge of dedicated amateurs (e.g.
here). Thus, whilst I certainly learnt my way around the constellations and the details of the solar system as a child, it’s still more accurate to describe me using the diminutive: ‘stargazer’. Indeed, despite having treated myself to a retirement present of a lovely telescope, I remain happy simply to gaze: to gaze either at the whole sky – or what fraction of its delights that light pollution leaves to us – or, nowadays, to let my telescope meander across the heavens. Every patch of the night sky I turn my attention to, it seems to me, contains examples of unutterable and mysterious beauty. However, I have latterly begun to play with astrophotography; these are my reflections on the early stages of my rediscovery of the night sky. My recommendation is that you try to read it on a screen larger than a smartphone as there are a lot of images that will benefit from the expanded scale. Make yourself a drink and find somewhere comfortable to sit as this is going to be a long post!
 |
| Day one: assemble the delivered tripod and equatorial mount, with its geared motors; put the telescope together, checking the alignment of its mirror, fitting and aligning the small ‘finder-scope’ used to navigate to the right bit of sky, and fitting an eyepiece. Everything then needs to be balanced so that the small drive motors are not placed under strain; I’ve taken to using insulating tape in order to mark balance points etc. as it reduces the time taken to get everything set up for an evening’s observation in the garden. You can find all sorts of excellent descriptions of how the various sorts of telescopes work, so I’ll not bore with details beyond the fact that mine is a 150 mm Newtonian reflector on a motor-driven equatorial mount. It has a relatively long body, which helps with contrast when viewing planets. The key point about the equatorial mount is that it’s set to the observer’s latitude (51.28º N in my case); thus, once properly set up and pointing at the object being observed, it requires only one motorized drive in order to keep that object in the field of view as the Earth rotates underneath. The important phrase is ‘once properly set up’ – therein lies many a challenge. (All my kit was purchased locally, from F1 Telescopes. Sadly, after 20 years supporting amateur astronomers in Kent, they have recently ceased trading.) |
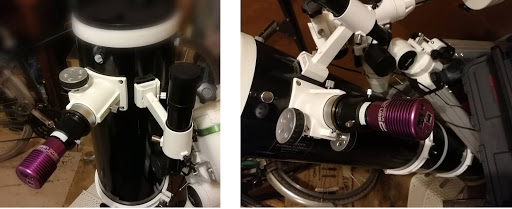 |
| After an initial attempt to capture images through the telescope’s eyepiece using a clamp to hold my smartphone in place, I gave up. It was an inexpensive method, but very frustrating in practice and I failed to get anything I was genuinely pleased with. I therefore opted for a bespoke imaging device which is in essence a digital camera or, rather, it’s the electronic heart of a camera: the light-sensitive chip that captures the image. The camera’s optical components, i.e. the complex lens assembly, is replaced by my telescope and all the software to control exposures, store the resultant images etc. resides in software on my laptop. My camera is the purple device shown above (Altair Astro GPCAM-290c). It directly replaces the eyepiece, and connects to my laptop via a USB cable. |
My initial ambition was to be able to view objects within the solar system – all eight planets if I could, although I was only confident about observing the Moon, Venus, Mars, Jupiter and Saturn. These are easily visible to the naked eye as bright spots in the sky – a large disk in the case of the Moon – although it’s far harder to make out colour and detail, even using binoculars. The choice of telescope was made with that overall goal to the fore. Beyond that I thought I might enjoy a few star clusters, like the Pleiades and perhaps a binary star here and there. It is probably true of all hobbies, but the evolution in my objectives was rapid. I started hunting out galaxies, such as our neighbour Andromeda, and nebulae (vast clouds of gas and dust, from which stars are created) like the Orion Nebula which, you’ll not be surprised to hear, sits within the constellation of Orion.
 |
Here it all is, set up in my back garden, camera connected to my laptop. The tripod has been aligned to North and levelled, the telescope is balanced and we’re ready to go.
|
Although one can pick out lots of detail on solar system objects through the telescope eyepiece, one is immediately and repeatedly reminded that the human eye isn’t good at seeing colour when the light intensity is low. That issue is made even more obvious when observing deep sky objects like galaxies and nebulae: they might easily be written off as wisps of cloud to the uninitiated. (Deep sky refers to objects that lie outside the solar system and are not individual stars, e.g. other galaxies, star clusters or nebulae.) So, having purchased the telescope from the gifts given to me by my family for Christmas/birthday, my wish-list for the following year contained a plea for contributions towards a decent first astro-camera. It’s barely left the telescope since. Everything has a cost of course, beyond the monetary, and in this case it’s the need to master a lot of new software in order even to capture an image in the first place let alone process the resultant data into something vaguely pleasing. The learning curve is steep and long, and the further I travel along it the more I realise I need to learn. Thankfully, there are many others out there travelling the same road – and some are sufficiently far ahead that it’s possible to learn from them. On Twitter, for instance, I’ve latched on to several people’s posts as a source both of inspiration and education (e.g.
this tweep and
this one) and have found some genuinely useful material on YouTube (e.g.
here). Also, to be frank with you, I’d be further along the road were it not for the fact that the COVID-19 lockdown – shielding in my case – had the bizarre effect of sapping the fun out of pre-existing hobbies. As a result, I all-but ignored my telescope, and creative writing, and reading, and … for several months. I replacing them with the creation of a couple of video series:
Physics in the House aimed at the membership of my local U3A branch (
here) and
Physics Beyond the House. Although I’m still not writing much – snippets, and a couple of free-form poems in order to have something to discuss over
Zoom with the Creative Writing group I’m in – I have started reading again, and most importantly I’ve had the telescope out in the garden once more.
Rather than expose too much of my inexperience in this post, I’ll show you a few of the images I have captured. I’ll use the associated captions in order to fill in a few of the details.
 |
| These images of the Moon illustrate one of the issues. The image on the left is a picture captured using my smartphone at the eyepiece: I get the entire Moon, but the detail is poor; I could have persisted using the ‘Raw’ and ‘Pro’ options on the ’phone camera in order to control the setting manually, but the incentive was weak given the difficulty of aligning the thing in the first place. Having moved to the bespoke astro-camera and it’s possible to get the central image. In terms of quality, this is so much better – but the field-of-view (FoV) is severely limited. Now, the Moon has an apparent diameter which extends across 31 arcmin – i.e. about ½º – so that implies my telescope/camera combination will image only about ¼ - ⅓ of that, or about 8-10 arcmin. (There are 60 arc minutes in one degree, 60 arc seconds per arcmin.) Thus, to get the image on the right I had to combine five separate overlapping images into one mosaic composite. The detail is far better resolved; indeed, by comparing the image to a lunar map (- there’s an excellent app called LunarMap HD which will suffice for most purposes) I estimate that features down to about 30-40 km are identifiable. Although it took a lot of time and effort I think my composite image is rather nice, even though I say so myself ;-) |
The Moon video above, which is best viewed in full screen mode, illustrates two important points: the way in which images are captured and the effects of atmospheric turbulence. Playing the video in slow motion and/or on a larger screen will help reveal the apparent ripples on the Moon.) ‘Seeing’ is the astronomer’s term for the effect of turbulence caused by thermal effects in the atmosphere which cause variations in its refractive index and therefore distortions in what is observed at ground level. (See video (17) in my Physics in the House series for an explanation of the phenomenon of refraction.) However, it also allows me to introduce a key feature in the image-capturing process. One doesn’t, as a rule, simply ‘click’ and take a single frame; instead, an extended series of frames (referred to in the jargon as sub-exposures, or ‘subs’) is captured in the form of a movie file. The details of each frame are set in advance – so, for instance, the exposure time might vary from a fraction of a second to several minutes – as is the total number of subs, which is a number typically (for me) in the hundreds. Ideally, the telescope would be set up so precisely that longish exposure times would be practicable and an accumulated total of hours of subs collected. I’m not yet in that league; at the moment I tend to use subs of no more than a second or two at the very best, and I seldom manage more than 500 of them at a time.
 |
| These images of Venus (108 million km from the Sun, c.f. the Earth at 150 million km) bring us to the next point. Given that multiple sub-exposures, subs, are collected as a movie, there has to be a process whereby they can be added together: this is called stacking in the trade. There are all sorts of software packages available to help one manage this. I started with Registax but subsequently moved across to AutoStakkert, although I still use Registax for a final 'polish' using its wavelets analysis function. In essence, both of these free-to-download packages allow the user to combine the best of the subs into a final stacked image - I simply find AutoStakkert easier to use. It sounds ‘easy’ but in this stage, as with all the other stages, there are many possible routes one might follow. The version on the left was stacked via one ostensibly reasonable route whereas the image on the right, which is significantly ‘sharper’ is the result of taking an alternative route … Whilst there are useful blog posts and YouTube videos, it seems that trial-and-error is the expected way forward. (To be genuinely useful, a tutorial needs to come from someone with experience and understanding and an appreciation of the subtleties of a teacher; this is a combination of skills and attributes hard to find in the plethora of material available online.) In passing, it’s worth noting that Venus appears featureless because it’s completely covered in relatively reflective clouds - I'd need sensitivity to uv light in order to be able to pick out variations. Also, because it’s closer to the Sun than is the Earth, we get to see it as a crescent – for exactly the same basic reason as we enjoy the waxing and waning phases of the Moon. The images shown are in greyscale, but when attempting colour images one needs to be aware that digital cameras are most sensitive to green (see the very first test image I took, below, of a distant TV aerial). Further image processing is a necessity in order to bring out the colours; I use an old version of Adobe Photoshop (CS) for this. To be honest, this is yet another stage in the astrophotography game that I continue to struggle with: there are endless combinations of ‘levels’, ‘curves’, ‘colour balance’, ‘saturation’ and ‘brightness/contrast’ to play around with. Experience is everything, and that takes time to accrue. |

 |
| The above images of Jupiter (780 million km from the Sun), and particularly of Saturn (1.4 billion km from the Sun) show how important it is to have good ‘seeing’. Both stacked images came from ~500 sub-exposures (subs), with ~25% of the best of them contributing to the stacked images seen here. The picture of Jupiter looks OK – indeed, we can see three of its moons (see re-processed images below, in which the brightness around the planet has been boosted; the inverted image on the right provides another route by which fainter objects might be spotted). The stacked image of Saturn is less good however: we can’t resolve even the separation of the two major ring systems, which I’ve observed through the eyepiece before, and none of its moons are visible. The images were collected on the same night’s observation earlier this month and provide a perfect example of the losses one incurs when the seeing is not optimal. |

 |
| Now we come onto Deep Sky images, although still within our own galaxy, the Milky Way. Shown above is M32, the Orion Nebula, which is a vast cloud of dust and gas – the material from which new stars are formed. The cloud is illuminated and energised by some very bright stars – the four near the centre of this image – which are emitting a lot of UV light and causing the gas to glow. It’s a little over 1,344 light years away (i.e. the light which formed this image began its journey across space in the year in which, according to Wikipedia, “King Wulfhere of Mercia dies after a 17-year reign and is succeeded by his brother Æthelred; King Hlothhere of Kent re-establishes Kentish supremacy in London; in Japan, Emperor Tenmu decrees the end of serfdom and issues a decree to distribute the tax-rice for peasants in poverty”. This is the first, and so far only such object captured – a fact that is all too evident in the rudimentary nature of the image. I’ll return to this at some stage and re-observe it in light of my growing experience. If nothing else, I’ll need more and longer subs which in turn means a superbly set up telescope. In addition, given that M42 covers a relatively large patch of the sky, 1½ x 1º, and noting the very small field-of-view accessible from my equipment, you’ll appreciate that I’m only able to capture a small proportion of the whole nebula. (The location map on the right is taken from here.) |
 |
This is as good a point as any to talk about the tricky business of focusing - tricky because each touch on the telescope's focus wheel sets up vibrations in the image. One effective solution is the use of something called a Bahtinov mask (see here for details) which covers the telescope's objective and creates a diffraction pattern in the eyepiece/camera. The physics behind diffraction patterns need not detain us here, fascinating though it is, since the key point is easy to describe. With the telescope's field of view centred on a reasonably bright star, one adjusts the focus until the arms of the X-shaped lines cross at the star's centre. At that point, the system is focused and the mask may be removed. All one needs is enough starlight to generate a visible pattern: the one in the image above is too bright.
|
 |
The image above is, I think, of the binary star system ‘Epsilon (ε) Dra (Σ2603)’ in Draco, near the Plough. However, I only think it is … a fact that brings us to yet another problem which needs some sort of solution. I need an accurate idea of where I am looking. There are computer algorithms, called ‘plate resolving software’, which can analyse the stars in an image and provide a precise location – but they won’t operate with the equipment I have because of the limited field-of-view I’ve mentioned before, i.e. there are not enough things in view for the algorithm to work. The same issue pertains to locating individual objects like galaxies or the smaller and more distance nebulae, which is why ‘easy’ targets like the Orion Nebula are the only realistic ones for me at present.
|
 |
| I can’t conclude without mentioning our nearest star, the Sun. Apart from anything else, this is astronomy that can be undertaken without the loss of sleep! For a small outlay, I bought an A4 sheet of specialist solar filter material that blocks 99.999% of the Sun’s light. I glued and duct-taped the major portion onto the ring of a cake mould which was large enough to slip over the front of my telescope, and used most of the rest to make a similar cover for the telescope’s finder scope out of a length of plastic tubing. The mottled appearance to the Sun’s surface is from the huge convection currents that churn through its surface layers. Notice the limits imposed by the small available FoV again. There were no sunspots on the day I tried this out, but one day … |
I could easily spend the next season getting improved versions of the above images. Whilst better seeing is down to the atmosphere, I could introduce a more sophisticated setup procedure for the telescope (Polar Alignment is an obvious next step: referencing the initial alignment to Polaris, the Pole Star, about which the night sky rotates) and then collect more/longer subs so as to get an improved final image. However, I want to combine that with an expansion in the list of targets. I still want to work my way through the solar system of course, but there are some Deep Sky objects I’d also like to track down which will survive the limited FoV of my current telescope and camera. After that I shall need to bring out my little contributions ‘money box’ again.

This post is dedicated to Rachel, who wanted to know more – it’s always good to want to know.


No comments:
Post a Comment